
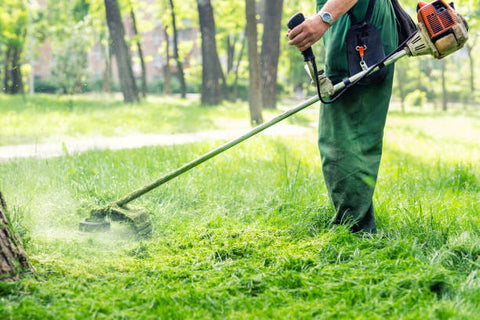
A beautifully manicured lawn is a testament to the care and attention you invest in your outdoor space. To achieve that pristine, well-groomed look, a whipper snipper is a trusted companion in your arsenal of garden tools. This versatile piece of equipment helps you tackle unruly grass, weeds, and overgrown edges with precision and ease.
However, while whipper snippers are known for their efficiency, their performance and lifespan largely depend on one critical factor—proper maintenance. Neglecting the care of your whipper snipper can lead to frustration, costly repairs, and diminished results in your lawn maintenance efforts.
In this comprehensive guide, we will delve deep into the world of whipper snipper care, providing you with the knowledge and strategies necessary to keep this indispensable tool in peak condition. Whether you're a seasoned gardener or just starting your lawn care journey, understanding how to maintain your whipper snipper will not only extend its durability but also enhance its overall performance.
By the end of this guide, you'll have the expertise needed to keep your whipper snipper humming smoothly and your lawn looking its best. Your investment in whipper snipper care will not only save you time and money but also contribute to the overall health and appeal of your outdoor space.
So, let's embark on this journey together, as we explore the world of whipper snippers and unveil the secrets to their longevity and peak performance. It's time to take your lawn maintenance to the next level by mastering the art of whipper snipper care.
How does a whipper snipper work?
Before diving into the specifics of whipper snipper maintenance and usage, it's essential to understand how these versatile tools work. A whipper snipper operates on a relatively straightforward principle. Let's explore the mechanics behind its functionality:
1. Engine Power
At the heart of a whipper snipper is its engine, which provides the power needed to rotate the cutting head rapidly. The engine can be powered by gasoline (in gas-powered models) or electricity (in electric models).
2. Cutting Head
The cutting head is the business end of the whipper snipper. It houses a flexible nylon line, which serves as the cutting tool. When the engine powers up, it drives the cutting head into rotation.
3. Centrifugal Force
As the cutting head spins, the flexible nylon line extends outward due to centrifugal force. This extension of the line creates a cutting surface with a high linear velocity.
4. Cutting Action
The rapidly spinning nylon line makes contact with grass, weeds, or other vegetation, effectively cutting through them. This cutting action is similar to that of a serrated knife but on a much faster and smaller scale.
5. Adjustable Height
Most whipper snippers allow users to adjust the cutting height or depth. This feature allows for precision trimming, especially when edging around sidewalks or flowerbeds.
By understanding the mechanics behind its functionality, you now know how the engine's power drives the cutting head's rapid rotation, extending the flexible nylon line through centrifugal force. This extended line becomes the cutting tool, efficiently trimming grass and weeds. With this knowledge, you're well-equipped to use and maintain your whipper snipper effectively.
Regular Maintenance Routine
A well-maintained whipper snipper is the key to achieving excellent results in your lawn and garden maintenance tasks. Regular maintenance not only extends the life of your tool but also ensures that it operates efficiently. In this section, we will outline a comprehensive routine for whipper snipper care.
1. Cleaning and Debris Removal
One of the fundamental aspects of whipper snipper maintenance is keeping it clean and free from debris. After each use, follow these steps:
- Power Off: Ensure the whipper snipper is turned off and the engine is completely cool before starting any maintenance.
- Remove the Spark Plug: Disconnect the spark plug to prevent accidental starts.
- Cleaning the Exterior: Wipe down the exterior of the whipper snipper, removing grass clippings, dirt, and debris. A stiff brush or compressed air can help dislodge stubborn residue.
- Cleaning the Cutting Head: Remove any grass or weeds stuck in the cutting head or around the trimmer line or blade. Use a brush or a wooden dowel to clear debris from hard-to-reach areas.
2. Lubrication of Moving Parts
Proper lubrication ensures that moving parts function smoothly and reduces wear and tear. Here's what you should do:
- Lubricate the Trimmer Head: Apply a lubricant to the trimmer head's moving parts, such as the gearbox or spindle, as recommended by the manufacturer. Regular lubrication prevents rust and maintains smooth operation.
3. Checking for Loose or Damaged Components
Regular inspections can help you identify and address potential issues before they become major problems:
- Inspect Bolts and Nuts: Check for loose or missing bolts, nuts, or screws on the whipper snipper's body and handle. Tighten as necessary.
- Examine the Cutting Head: Inspect the trimmer line or blade for damage or signs of wear. Replace if needed.
- Inspect Spark Plug and Air Filter: Periodically check the spark plug for fouling or wear and replace it if necessary. Also, clean or replace the air filter to ensure proper engine performance.
4. Fuel System Maintenance (Gas-Powered Models)
For gas-powered whipper snippers, proper fuel system maintenance is critical to prevent engine issues:
- Fuel Quality: Use clean, fresh gasoline with the correct octane rating, and add a fuel stabilizer if storing the tool for an extended period.
- Fuel Filter: Replace the fuel filter annually or as recommended by the manufacturer.
- Carburetor: Periodically clean or have a professional service the carburetor to maintain proper fuel-air mixture.
5. Sharpening or Replacing the Trimmer Line
The cutting head's effectiveness depends on a sharp trimmer line or blade. Here's how to maintain it:
- Trimmer Line: Check the trimmer line regularly for wear or damage. Replace it if it becomes too short or frayed. Sharpen blades as needed.
6. Keeping a Maintenance Log
Consider keeping a maintenance log to track when you perform these routine tasks. This log can help you identify patterns or issues that may require attention and ensure that you stay on top of your whipper snipper's care.
By following this regular maintenance routine, you'll not only extend the life of your whipper snipper but also ensure it consistently delivers top-notch performance in your lawn care endeavors.
How do I replace the line in a whipper snipper?
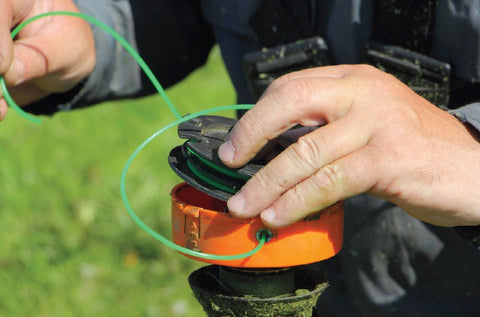
Over time, the cutting line in your whipper snipper will wear down or break, necessitating replacement. Knowing how to replace the line is a fundamental skill for whipper snipper maintenance. Here's a step-by-step guide to help you replace the line in your whipper snipper:
1. Gather the Necessary Tools
Before you begin, gather the following tools and materials:
- Replacement nylon line (appropriate for your whipper snipper model).
- Safety glasses.
- Work gloves.
- Screwdriver (if required for access to the cutting head).
2. Prepare the Whipper Snipper
Depending on your whipper snipper model, you may need to perform the following steps:
- If there is an existing line in the cutting head, remove it by unwinding or cutting it as necessary.
- If the cutting head is covered by a protective shield, use a screwdriver to remove it (if applicable).
3. Thread the Replacement Line
Follow these steps to thread the replacement line:
- Cut a length of replacement nylon line, typically following the recommended length for your whipper snipper model.
- Locate the line-loading ports or notches on the cutting head.
- Insert one end of the nylon line into one of the ports or notches, following any directional arrows.
- Wind the line around the cutting head in the direction indicated by the arrows.
- Leave a small tail (approximately 5-10 centimeters) sticking out.
4. Secure the Line
Ensure the line is securely wound around the cutting head, with no loose or dangling sections.
5. Reassemble the Whipper Snipper
If you removed a protective shield or any components, reassemble them according to your whipper snipper's instructions.
6. Test the Whipper Snipper
Before using the whipper snipper, check that the replacement line is correctly installed and secure. If necessary, trim the excess line to the desired length.
With the replacement line properly installed, your whipper snipper is ready for use. Regularly inspect the line during operation, and replace it when it shows signs of wear or damage to ensure efficient trimming.
Storage and Transportation

Proper storage and transportation of your whipper snipper are essential to maintain its longevity and functionality. Whether you're putting it away for the winter or simply moving it between work sites, following these guidelines will help protect your investment.
1. Proper Storage Practices
When your whipper snipper is not in use, it's crucial to store it correctly to prevent damage and ensure it's ready to perform when needed:
- Clean and Dry: Before storing your whipper snipper, ensure it's clean and dry. Remove any dirt, grass clippings, or debris that may have accumulated during use.
- Fuel Management: If you're storing a gas-powered model for an extended period, consider draining the fuel tank or adding a fuel stabilizer to prevent fuel degradation and carburetor issues.
- Remove the Spark Plug: To prevent accidental starts, disconnect the spark plug before storage.
- Securely Hang or Store: Hang your whipper snipper on a wall or store it in a dry, secure place to prevent damage from moisture or falling objects.
- Cover It Up: Consider using a protective cover or tarp to shield your whipper snipper from dust and moisture.
2. Preparing for Long-Term Storage
If you anticipate not using your whipper snipper for an extended period, such as over the winter months, take extra precautions to ensure it remains in top condition:
- Fuel System: For gas-powered models, empty the fuel tank and run the engine until it stalls to remove remaining fuel from the carburetor.
- Oil Change: Change the engine oil to prevent contaminants from settling in the crankcase during long-term storage.
- Battery Care (Electric Models): If you have a cordless electric whipper snipper, store the battery separately and in a cool, dry place to prolong its life.
- Inspect and Lubricate: Before storing, inspect the whipper snipper for any worn or damaged parts, and lubricate moving components as needed.
3. Safety Considerations During Transportation
When moving your whipper snipper between work sites, follow these safety guidelines to ensure safe transportation:
- Power Off: Always turn off the whipper snipper and allow it to cool down before transporting it.
- Securely Fasten: If transporting in a vehicle, secure the whipper snipper to prevent it from tipping over or shifting during transit.
- Fuel Management: For gas-powered models, avoid transporting the whipper snipper with a full fuel tank, as fuel may leak during transport.
- Protect the Cutting Head: To prevent damage or accidents, protect the trimmer line or blade during transportation using a blade guard or cover.
By adhering to these storage and transportation practices, you'll safeguard your whipper snipper from potential damage and ensure it remains in excellent condition between uses.
Troubleshooting Common Issues
Even with regular maintenance, whipper snippers can encounter issues during operation. Knowing how to diagnose and resolve these common problems is essential for keeping your tool running smoothly.
1. Engine Won't Start
If your whipper snipper's engine refuses to start, consider the following troubleshooting steps:
- Check Fuel Level: Ensure there is enough fuel in the tank for the engine to run. For gas-powered models, also make sure the fuel is fresh and not contaminated.
- Inspect Spark Plug: A fouled or damaged spark plug can prevent the engine from starting. Clean or replace it as needed.
- Choke and Throttle: Ensure the choke and throttle settings are correct for starting. Consult your owner's manual for the recommended settings.
- Pull Cord: Check the pull cord for damage or entanglements. If it's frayed or stuck, it may need to be replaced.
- Prime the Engine (Gas-Powered Models): If your whipper snipper has a primer bulb, press it a few times to supply fuel to the carburetor before attempting to start the engine.
2. Engine Runs Poorly
If your whipper snipper's engine runs erratically or lacks power, consider these troubleshooting steps:
- Check Air Filter: A dirty or clogged air filter can impede airflow to the engine, affecting performance. Clean or replace the air filter as needed.
- Inspect Spark Plug: A fouled or worn spark plug can lead to poor engine performance. Clean or replace it according to the manufacturer's recommendations.
- Fuel Quality: Ensure you are using clean, fresh fuel with the correct octane rating. Stale or contaminated fuel can cause engine issues.
- Carburetor Adjustment (Gas-Powered Models): If the engine runs poorly despite proper fuel and spark plug, consult your owner's manual for instructions on adjusting the carburetor.
3. String Won't Feed or Breaks Frequently
Issues with the trimmer line can be frustrating. Here's how to troubleshoot problems with string feed and breakage:
- Check Line Length: Ensure that the trimmer line is the appropriate length and properly loaded in the cutting head.
- Inspect the Cutting Head: Remove any debris or tangles from the cutting head that may be preventing the line from feeding.
- Line Diameter: Use the correct trimmer line diameter specified in the owner's manual. Using the wrong size can lead to feed issues.
- Trimming Technique: Avoid excessive force or contact with hard surfaces, as this can cause the line to break more frequently.
4. Excessive Vibration or Noise
Excessive vibration or unusual noise levels can indicate underlying problems:
- Loose Components: Check for loose bolts, nuts, or screws on the whipper snipper's body and handle. Tighten as necessary.
- Inspect Cutting Head: The cutting head should be secure and free from debris that could cause imbalance or excessive noise.
- Engine Issues: If vibration is coming from the engine, consult a professional for diagnosis and repair.
Addressing these common issues promptly can prevent further damage to your whipper snipper and ensure it operates smoothly. In the next section, we'll discuss safety precautions to keep in mind while using your whipper snipper, as well as environmentally responsible practices.
Safety Precautions
Operating a whipper snipper, like any power tool, requires strict adherence to safety precautions to prevent accidents and injuries. Whether you're a seasoned professional or a novice user, it's essential to prioritize safety at all times.
1. Personal Protective Equipment (PPE)
Wearing the right personal protective equipment (PPE) is the first line of defense against potential hazards associated with whipper snipper operation:
- Safety Glasses: Protect your eyes from flying debris, dust, and small particles.
- Hearing Protection: High noise levels from the whipper snipper can damage your hearing over time. Use earmuffs or earplugs to reduce noise exposure.
- Closed-Toe Shoes: Wear sturdy, closed-toe shoes with slip-resistant soles to prevent foot injuries.
- Long Pants: Long pants provide additional protection against debris and sharp objects.
- Gloves: Gloves offer a better grip on the tool and protect your hands from blisters and scratches.
2. Handling Fuels and Oils Safely (Gas-Powered Models)
If you're using a gas-powered whipper snipper, proper handling of fuels and oils is crucial:
- Fuel Storage: Store gasoline in approved containers designed for fuel storage. Keep containers tightly sealed and away from open flames or heat sources.
- Refueling: Refuel the whipper snipper in a well-ventilated area, and never while the engine is hot or running. Allow the engine to cool down before refueling.
- No Smoking: Avoid smoking or using open flames near gasoline or fueling areas.
- Dispose of Waste Properly: Dispose of used engine oil, fuel, and oil filters in an environmentally responsible manner, following local regulations.
3. Avoiding Common Injuries
To prevent common injuries associated with whipper snipper use, follow these guidelines:
Watch Your Surroundings: Be aware of your surroundings and potential hazards, such as rocks, tree roots, and obstacles in your path.
- Proper Grip: Maintain a firm grip on the handle, and use both hands while operating the whipper snipper.
- Mind the Cutting Head: Keep the cutting head away from your body and legs while in operation, and never point it at people or animals.
- Use Caution on Slopes: Exercise caution when using a whipper snipper on slopes or uneven terrain to avoid loss of balance.
- Know Your Limits: If you're fatigued or unfamiliar with the tool, take breaks and operate the whipper snipper within your capabilities.
You’ll significantly reduce the risk of accidents and injuries while using your whipper snipper by following these safety precautions. Your safety and the safety of those around you should always be the top priority.
Conclusion
In this comprehensive guide, we've explored the world of whipper snippers, from understanding their inner workings to mastering essential maintenance techniques. With a deeper insight into how these versatile tools operate and the knowledge to replace the cutting line, you're well-prepared to embark on your journey into the world of whipper snippers, ensuring that your lawn and garden maintenance practices are not only effective but also responsible and sustainable.
By following safety precautions, considering environmental responsibility, and embracing the art of whipper snipper maintenance, you can confidently maintain a well-manicured outdoor space while safeguarding your safety and minimizing your impact on the environment.
If you're looking for a high-quality whipper snipper, explore our curated collection, handpicked for efficiency and performance.
So, whether you're gearing up for your next landscaping project or looking to keep your lawn's pristine appearance, let's get started on your journey to whipper snipper expertise.
Your outdoor space awaits your expert touch. Happy trimming!