
Gardening tools, like whipper snippers, are essential allies in maintaining the beauty and health of your lawn and garden. But their effectiveness hinges significantly on how well they are maintained. Regular maintenance is more than a mere chore; it's a crucial practice that ensures your whipper snipper operates at peak efficiency and has an extended lifespan. In this comprehensive guide, we'll walk you through the essential steps of a regular maintenance routine for your whipper snipper. From cleaning to lubrication, and from component checks to fuel system care, we've got you covered.
Whether you're a seasoned gardener or new to the world of lawn care, these maintenance tips will help you keep your whipper snipper in top-notch condition, ensuring that every trim and cut is as effective as the first.
Cleaning and Debris Removal
The foundation of whipper snipper maintenance lies in regular cleaning and removal of debris, a process that protects and prolongs its life.
1. Power Off and Safety Precautions
- Ensuring Safety: Always start by turning off the whipper snipper. If it's gasoline-powered, wait until the engine has cooled down to avoid any burn risk.
- Disconnecting the Spark Plug: This is a critical safety step for gas models. Detach the spark plug to eliminate any risk of the tool starting inadvertently during maintenance.
2. Detailed Cleaning Steps
- Wipe Down the Exterior: Begin with a thorough wipe down using a damp cloth. Target areas like the handle, shaft, and engine cover, where grime and plant residues tend to accumulate.
- Removing Tough Residues: Use a stiff brush, ideally with nylon bristles, to scrub off dried mud, grass, and other stubborn residues. In hard-to-reach crevices, compressed air can be particularly effective in dislodging hidden debris.
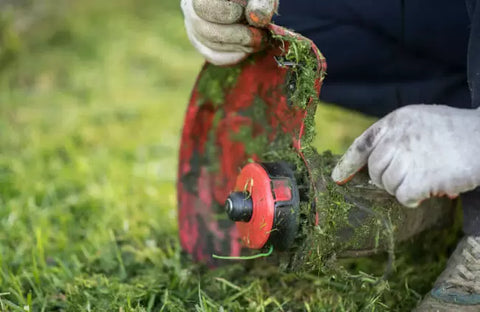
3. Special Attention to the Cutting Head
- Regular Inspection: Regularly inspect the cutting head for any tangled vegetation or debris, as these can impair the tool's function and cause undue wear.
- Careful Removal of Debris: Utilize a soft brush or a wooden dowel to gently clear away any entangled material from the cutting head and trimmer line or blade. This step should be done delicately to avoid damaging the line or cutting mechanisms.
4. Cleaning Frequency and Techniques
- Post-Use Cleaning: Make it a habit to clean the whipper snipper after each use. This not only keeps the tool in optimal condition but also makes it easier to inspect for any wear or damage that might need attention.
- Deep Cleaning: Periodically, a more thorough cleaning is recommended. This may include using mild detergents for tough stains and ensuring that all vents and filters are clear of dust and dirt to maintain proper airflow and cooling.
Lubrication of Moving Parts
Proper lubrication is essential for the smooth operation and longevity of your whipper snipper's moving parts.
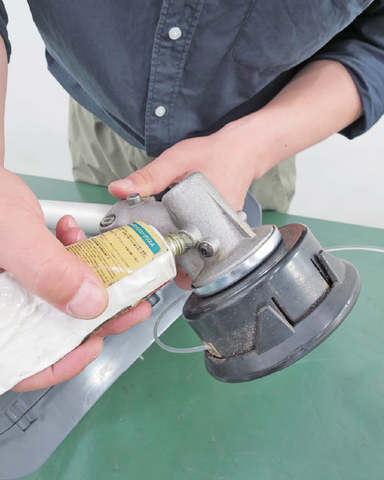
Lubricating the Trimmer Head
- Choice of Lubricant: Select a lubricant recommended by the manufacturer. Typically, a lightweight machine oil or a specific trimmer head lubricant is ideal.
- Application Process: Apply the lubricant to the moving parts of the trimmer head, such as the gearbox or spindle. Be careful not to over-lubricate, as excess lubricant can attract dirt.
- Frequency: Lubricate these parts every few months or as per the usage frequency and manufacturer’s guidelines.
Checking for Loose or Damaged Components
Regular inspections can prevent small issues from turning into major problems.
1. Inspecting Bolts and Nuts
- Regular Checks: Routinely inspect all bolts, nuts, and screws for tightness. A loose handle or cutting head can be dangerous.
- Tightening Process: Use the appropriate tools to tighten any loose components. Avoid over-tightening, which can strip the threads.
2. Examining the Cutting Head
- Line or Blade Inspection: Regularly check the condition of the trimmer line or blade. Look for signs of wear, fraying, or damage.
- Replacement: Replace the trimmer line or blade when it shows significant wear. This ensures efficient cutting and reduces strain on the engine.
3. Spark Plug and Air Filter
- Spark Plug Maintenance: Check the spark plug for corrosion or buildup. Replace it annually or if it shows signs of wear.
- Air Filter Care: Clean or replace the air filter regularly. A dirty air filter can restrict airflow and impair engine performance.
Fuel System Maintenance (Gas-Powered Models)
For gas-powered models, maintaining the fuel system is crucial for engine health.
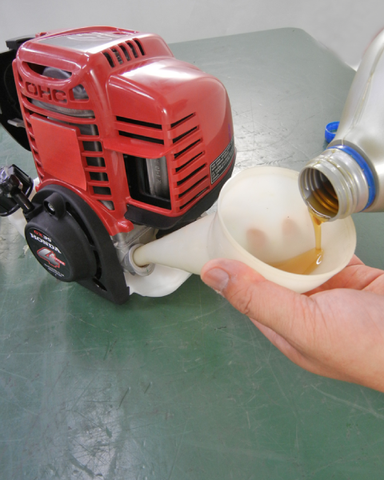
1. Fuel Quality and Storage
- Using Fresh Fuel: Always use clean, fresh gasoline with the correct octane rating. Stale fuel can cause engine problems.
- Fuel Stabilizer: If storing the tool for an extended period, add a fuel stabilizer to prevent the gasoline from deteriorating.
2. Fuel Filter and Carburetor
- Fuel Filter Replacement: Change the fuel filter annually or as recommended. A clogged filter can restrict fuel flow.
- Carburetor Maintenance: Clean the carburetor periodically to ensure a proper fuel-air mixture. Consider professional servicing for complex issues.
Sharpening or Replacing the Trimmer Line
Keeping the cutting head sharp is key to efficient operation.
1. Trimmer Line Maintenance
- Regular Checks: Inspect the trimmer line for wear at regular intervals. Frayed or worn lines reduce cutting efficiency.
- Line Replacement: Replace the line when it becomes too short or shows signs of wear. Ensure the replacement line is the correct diameter and length for your model.
2. Blade Sharpening
- Sharpening Blades: If your model uses a blade, sharpen it periodically to maintain cutting efficiency. Use a file or a specialized sharpening tool, following the manufacturer's instructions.
Keeping a Maintenance Log
A maintenance log is a valuable tool in tracking the care of your whipper snipper.
Benefits of a Maintenance Log
- Record Keeping: Log each maintenance task, including dates and details of the work done. This helps in tracking when certain tasks are due and identifies recurring issues.
- Long-Term Care: A well-kept log can be a reference for ensuring consistent care and can be useful if professional servicing is required.
The true potential of your whipper snipper is unlocked through diligent and regular care. This comprehensive maintenance routine is your roadmap to ensuring that every cut, trim, and edge you make is as efficient and effective as possible.
By adhering to these practices – from thorough cleaning and proper lubrication to meticulous inspections and timely replacements – you're not just maintaining a tool, you're investing in the longevity and reliability of an essential garden ally. A well-maintained whipper snipper not only performs at its best but also saves you time and effort in the long run.
Embrace these routines, and you'll find that your whipper snipper is more than a tool – it's a dependable partner in crafting the garden of your dreams. If you're looking for the best tools for your landscaping projects, check out our top-quality whipper snippers.